
Perform the following steps to install Oracle Grid Infrastructure on a stand alone server.
Oracle Grid Infrastructure installs Oracle Restart and Oracle ASM and you can configure Oracle ASM with at least one disk group during configuration. Once grid installation is completed,install Oracle Database that stores database files in Oracle ASM disk groups.
1.Go to software location and Start Oracle Universal Installer as the Oracle Grid Infrastructure software owner user(eg:Oracle).
2.Start the installer with the command
$ ./runInstaller
3.On the first screen of the installer, select Install and Configure Grid Infrastructure for a Standalone Server. Click Next.

4.On the Select Product Languages screen, select one or more languages.

5. On the CreateASMDiskGroup screen,The Create ASM Disk Group screen lists all the Oracle ASM disks.
Click Change Discovery Path to select any devices to be used by Oracle ASM.In the Change Disk Discovery Path window, enter a string to use to search for devices that Oracle ASM will use. Click OK. In our example, I selected path as "/dev/*"
* Set Redundancy to Normal
* Select the disks: /dev/sdb1, /dev/sdc1
* Click Next


Note:During installation, disk paths mounted on Oracle ASM and registered on ASMLIB with the string ORCL:* are listed as default database storage candidate disks
6. On the Specify ASM Password page,
* Select 'Use same passwords for these accounts'
* Enter your password
* Confirm the password
* Click Next

When you get warning on weak password, click Yes.
7. In the Privileged Operating System Groups screen, select the name of the operating system group you created for the OSDBA group, the OSASM group, and the database operator group OSOPER.
If you create only the dba group, then you can use that group for all three privileged groups.
If you created a separate asmadmin group, then use that value for the OSASM group. Click Next.
Note:These groups do not allow for job role separation. So a warning will appear. Click Yes

8. On the Specify Installation Location page, the location of the database home will be shown
* Set the Software Location to /u01/app/oracle/product/11.2.0/grid.
* Set the Oracle Base to /u01/app/oracle
* Click Next

9.select location for Inventory.

10. The Perform Prerequisite Check page appears and completes the checks.
Since the swap size and also some kernel parameters values were sufficient for testing purpose, I ignored the below errors. If it's for production, correct these errors and proceed.


On the Summary page, the installation settings are shown. Click Finish to complete the installation.
11. The setup page shows the install progress

12. The Execute Configuration Scripts page asks you to execute a configuration script as the root user.
* Open a terminal window.
* connect as the root user.
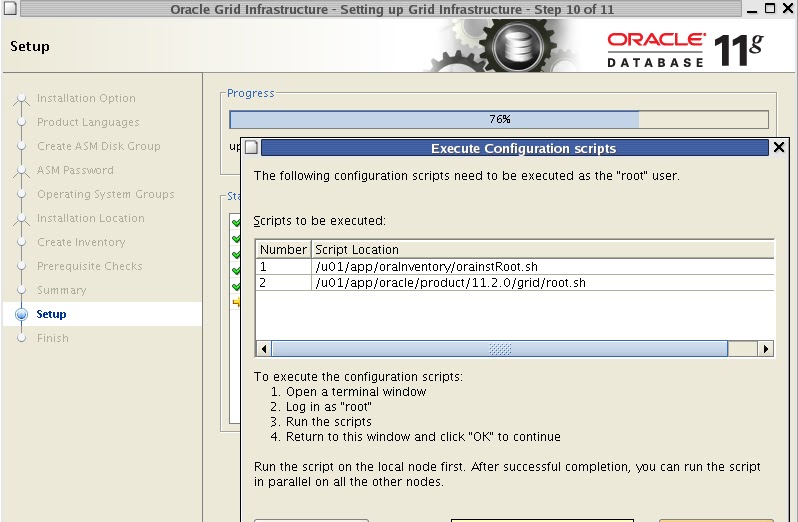
Copy the script name from the Execute Configuration Scripts page into to the terminal window and execute it with root user.


13. When the script has completed, Click OK in the Execute Configuration Scripts page.

14.When the Finish page appears, with the message "The installation of Oracle Grid Infrastructure for single Server was successful", click Close

Oracle ASMCA is installed as part of the Oracle Grid Infrastructure for a Standalone Server installation. To create additional disk groups, run the Oracle ASMCA utility as below.
Go to $GRID_HOME/bin and execute asmca as below
./asmca

To verify that the Oracle High Availability Service is installed properly, run ./crsctl check has command from Grid_home/bin directory.
[oracle@testdb bin]$ ./crsctl check has
CRS-4638: Oracle High Availability Services is online
To check the ASM. Connect to the ASM as below and check the diskgroup.
[oracle@testdb bin]$ . oraenv
ORACLE_SID = [oracle] ? +ASM
The Oracle base for ORACLE_HOME=/u01/app/oracle/product/11.2.0/grid is /u01/app/oracle
[oracle@testdb bin]$ sqlplus '/as sysdba'
SQL*Plus: Release 11.2.0.1.0 Production on Sun Mar 18 16:24:51 2012
Copyright (c) 1982, 2009, Oracle. All rights reserved.
Connected to:
Oracle Database 11g Enterprise Edition Release 11.2.0.1.0 - Production
With the Automatic Storage Management option
SQL> select name,type from v$asm_diskgroup;
NAME TYPE
------------------------------ ------
DATA NORMAL
No comments:
Post a Comment